The guitar is one of the few instruments where knowing the actual notes you are playing is not a big priority for most people, at least not in the beginning.
If you look at the piano for example, you’ll see that little children that have been playing for just a few months, or weeks even, know all the notes. They can name any key on the keyboard. But take the average adult that has been playing guitar for over a decade, point at a random note on the fretboard, and chances are that he or she will not know the name of that note, or will need some time to figure it out 🤔.
That’s not because guitar players are dumb or musically illiterate, but because the geometric nature of the guitar fretboard causes us to prioritize other things over learning all the notes on the fretboard. When you learn a simple C major chord in the open position for example, it’s much easier to just learn the fingering shape and place it on the fretboard, instead of thinking that you are playing "C, E, G, C, E". And even if you are a seasoned “intellectual" player and know all the notes on fretboard well, and you want to play, for example, an Eb major 7 drop 2 voicing, you will most probably place it using the shape, and maybe the root note, instead of thinking "Eb, Bb, D, G", even if you do know these notes.
The same goes for playing scales. Whether you like to memorize shapes, or prefer to use SFS and form your fingerings on the fly, you still don’t need to think of the name of every note you play. But as you progress, and as your playing starts to become more sophisticated, knowing the notes on the fretboard becomes increasingly important.
Those of you that studied SFS (String Fragment System) with me, have seen how knowing the root notes, for example, helps you to jump around freely everywhere on the fretboard. And if you did SFS Pentatonics 2 - Navigating Chord Changes, you have seen how knowing the notes, and locating them quickly, can help you to switch scales smoothly.
These are just two examples where this is useful, but the deeper you go with your guitar journey, the more you will see how learning the fretboard really well, and locating notes really fast, can help open up more and more musical possibilities.
Many people think that this is just too hard, and never try to do it. That’s because, indeed, the location of notes on the guitar fretboard is not as obvious as on the piano keyboard, or as on a saxophone, and so on. That doesn’t mean that we can’t learn them. We just need a step by step system to do it.
So when I started teaching in 2001, I saw the need for developing such a system, in order to help my students get to their destination sooner. That’s what I’m sharing with you here. I will explain the process, and then you can download, or stream the free “Fretboard Memorization Toolbox” which includes everything you need to practice this method. It also includes a PDF where you can find all the diagrams and a clear list of all the steps, so that you can follow it in your practice time.
In the beginning we will work with the natural notes (no sharps or flats) and we'll start with just four notes: A, B, C, and D. Four is a good number for this kind of practice. It's a good number for pieces of information that the human mind can handle without becoming overwhelmed. So we will start with A, B, C, and D, and learn them on one string at a time. That’s why I call this step "ABCD Horizontal”. We will move horizontally on the fretboard on one string at a time. And we will do it in 2 parts:
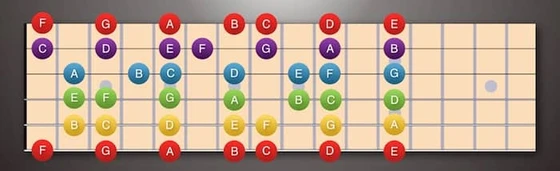
The first one is the ABCD drill. Let’s see how that works. In the video above I show it to you using string 4, which is a string that gives most people trouble, but then you should do this on every string. Take a look at this diagram and try to remember where A, B, C, and D are, on string 4:
Then you will use the ABCD drill videos from the toolbox to practice. There are two of them, a slower and a faster one, so that you can practice at two different speeds.
This is a fun way to do this, because you will be practicing over a backing track, which makes the whole process very musical. In the video I play a few examples, so that you can see exactly how that’s done.
So do this until you feel you can find them quickly without having to think about it much. When you can do this on all strings, without mistakes, then you can go to the second part which is ABCD improvisation.
In this part we basically take a backing track and improvise using these 4 notes on a single string. I have included 7 different backing tracks in different styles for you to improvise over.
Granted, there’s not much you can do with just 4 notes, but the process of trying to solo creatively with such limitations is actually very beneficial for the development of your musicality, so go ahead and try it.
In the video I play an example using string 4, but again, you should do this on all strings.
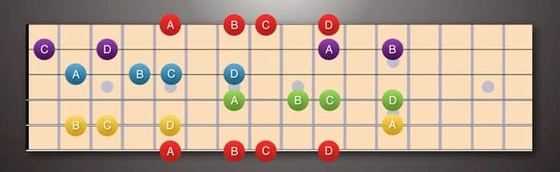
In step 2 we will take our guitar fretboard memorization skills to the next level. We will be working with the same four notes again, but this time we’ll do it vertically instead of on a single string. Take a look at this diagram:
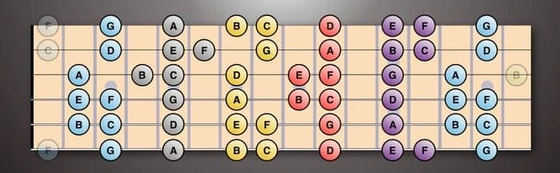
I have split the natural notes of the fretboard into 5 vertical groups. From these we will limit ourselves to ABCD for now: So what you do is to choose a vertical area and try to memorize where those four notes are. Then use the drill videos exactly like before, but using the vertical area you have chosen to practice.
After you can do the drill in all fretboard areas without mistakes, then you can move on to ABCD improvisation again. Improvisation using a vertical area can feel very strange and it can be even harder to produce nice melodies, but again it’s excellent practice, so give it a shot. Our goal is to learn the notes, so we don’t need to worry too much about the quality of our solo. In the video I play an example of this last part using vertical fretboard area number 3.
In this 3rd step we are basically repeating what we did in step 1, but using all seven natural notes. In the video I play an example of this, again on string 4, using one of the ABCDEFG drills.
In the improvisation part you're still limited to a single string, but now that you have all seven notes available, you can get a little more creative. Watch the video for an example of that.
In step 4 we go back to practicing vertically, but this time with all seven natural notes. Start with the ABCDEFG Drill and then, again, improvisation. In the improvisation part it's still going to be tricky, even though you have all seven notes, because of the vertical layout. Hopefully this will force you to come out of your comfort zone in order to produce something musical. In the video I play an example of the improvisation part again.
This step is a lot of fun. We are going to get out of the traditional guitar mentality of using fretboard shapes, and just improvise freely, just by stepping on the seven natural notes that we have practiced, anywhere we see them. Move horizontally on purpose, jump around, go crazy without thinking about any scale shapes.
For most people this kind of improvisation cannot get you to the level of comfort you can get with shapes, just because of the nature of the fretboard, but that’s not our goal anyway.
This way of looking at scales is called the "pitch content approach", and it works great on piano and other instruments. It’s actually the main way these musicians locate notes.
On the guitar it’s not very practical by itself, especially if you get into keys with a lot of sharps or flats. But it is an added layer of knowledge that can serve as extra security on top of a good visual system, like SFS for example.
Plus, it’s a great way to learn the fretboard. In the example I do not of scale shapes, on purpose, even though I know them well. I just locate the 7 natural notes and play freely.
In steps 6 and 7 we add sharps and flats. I used to have my students do this by simple call and response, but when I made the key cycle backing tracks for SFS Pentatonics 2, I realized that they are great for practicing this as well. That’s why I have included some of them in your Fretboard Memorization Toolbox.
So in step 6, choose a string, put on a Key Cycle backing track and play the root note for every chord that comes up. In step 7 do the same, but instead of strings, do it using vertical areas. By the time you get to this step you will have a good foundation of natural notes, so it’s going to be easy to add sharps and flats around them. Sharp is a fret higher and flat a fret lower than the natural note.
So with these 7 steps you will reach a whole new level of fretboard knowledge. Some of you will only need one round of each step to get to your goal so it can take just a few days, but for others you may need to go through the whole plan a few times. It all depends on your current level.
Before closing I will give you one more tip that can help solidify your fretboard knowledge. If you like to quickly transfer ideas or shapes all over the fretboard, a slightly different skill is to locate a single note in every possible position.
So you choose a note and practice playing it on every string. In the toolbox you can find an extra lesson, a video excerpt from SFS Pentatonics where I explain how to do this.
I hope you enjoyed this, and I am sure that it will help you reach your goal of mastering the fretboard sooner.
Enjoy your practice and be effective!